Getting ASP.NET Core is easy, there are two ways to setup the development environment.
1) Install Visual Studio 2017, which will install .NET Core SDK along with VS 2017, get the VS 2017 version from here https://www.visualstudio.com
Once you downloaded VS 2017 community edition and following the instruction, make sure you selected ASP.NET and web development workload check box and click install.

2) If you wanted to develop with ASP.NET Core 2.0 in Visual Studio Code, you just need to grab the ASP.NET Core SDK separately.Visual Studio Code homepage at https://code.visualstudio.com , where you can download the latest version of the Visual Studio Code editor for your operating system.
Next thing is to install the .NET Core SDK at https://www.microsoft.com/net/core . Just pick your operating system and follow the installation instructions.
Open VS 2017. Create a new solution with the name FirstAspNetCoreConfig.soluation as shown below

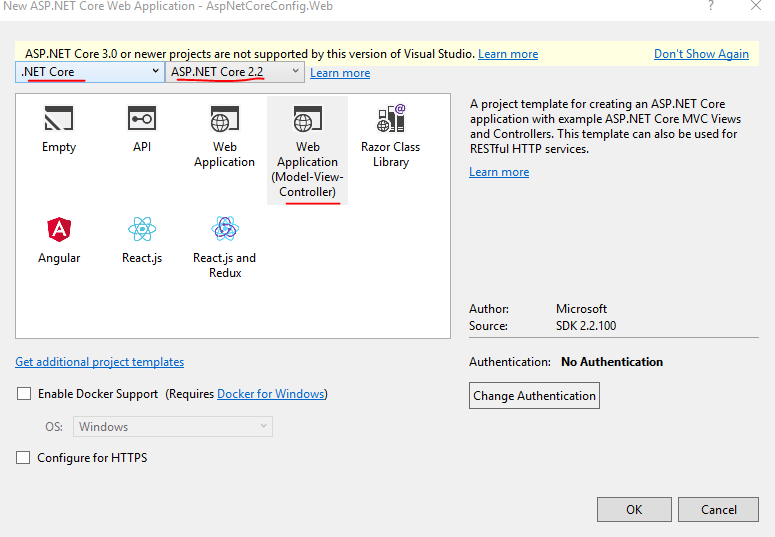
Create a new ASP.NET Core Web Application Project with the name AspNetCoreConfig.Web

Click Ok, A pop-up shown as below, allow the user to select the ASP.NET Core framework version and Template. Make sure to select ASP.NET core 2.2 ( you version may be different).
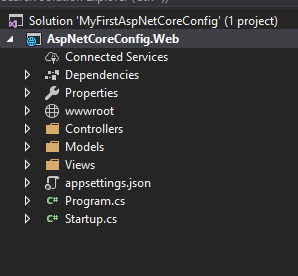
VS2017 will create the web application that is shown below
To make sure the newly created web application builds and runs correctly, click IIS Express from the VS2017.![]()
your application will be executed and opens in the default browser.

Before writing any code, we would like to understand ASP.NET Core Web Project structure, understand different folders, files were added.
Dependencies:
An ASP.NET project introduces the Dependencies node inside the project, which houses all project level infrastructure dependencies, like NuGet packages, SDKs etc. All the dependencies will be restored initially when the project is created and loaded for the first time.
wwwroot:
The wwwroot folder contains all the static files of the project, HTML, CSS,JavaScript. These files will be served to the user directly.
Controllers:
The Controllers folder will hold all the MVC/Web API controllers in the ASP.NET Core Project.
Models:
All the web application View Models are placed in this folder. A View model is typically used by the View for displaying data and submitting it.
Views:
The Views folder holds all the .cshtml files.
AppSettings.json:
This file can be used to store configuration key/value pairs (just like appsettings in web.config of traditional ASP.NET projects).
Program.cs:
This file provides the entry point for running the application, with a main method that can be executed to configure the hosting environment and select the class<Startup.cs> that complete the configuration for the ASP.NET Core application.
With the release of ASP.NET Core 2, the configuration is simplified by the use of the CreateDefaultBuilder method, which configures ASP.NET Core. The UserStarup method is called to identify the class that will provide application specific configuration.The Build method processes all the configuration settings and creates an object that implements the IWebHost interface, which is returned to the Main method, which calls Run to start handling HTTP requests.
Startup.cs:
Startup.cs configures the environment for the ASP.NET Core Web Application. The startup.cs class defines two methods, ConfigureServices and Configure, that set up the shared features required by an application and tell ASP.NET Core how they should be used.
ConfigureService.cs method create its services, services are objects that provide functionality to other parts of the application. Once the service has been created, ASP.NET calls the Configure method. The purpose of this method is to set up the request pipeline, which is the set of components – know as middleware, that are used to handle the HTTP requests and produce response for them.

ASP.NET uses the Startup class to configure an application
SETTING UP THE APPLICATION CONFIGURATION:
The configuration system is one of the important changes in the ASP.NET Core project. In previous versions of web applications, Web.config was used to hold configuration in its appsettings section. In the new ASP.NET Core system, appsettings.json is used to hold the configuration values.
Appsettings.json is a lightweight configuration file that stores all settings in JSON format; just as in web.config, we can have different configuration files for different environments. Accessing this configuration data can be done through the Options pattern, and ASP.NET Core provides default middleware to achieve this functionality.
Step 1: Add Appsetting section in the default appsettings.json file
{
"AppSettings": {
"ApplicationTitle": "Awesome Asp.Net Core App-DEV",
"Author": "Anonymous",
"ContactDetails": {
"Address": "100 Main st",
"Phone": "123-345-6789",
"Email": "test@gmail.com"
}
},
"Logging": {
"LogLevel": {
"Default": "Warning"
}
},
"AllowedHosts": "*"
}
To use the newly added appsettings configuration settings, we have to make sure that the appsettings.json file is loaded to the configuration builder, which is used to build the configuration of key/value based settings. go to the startup.cs file , add below lines of code which are in bold.
public void Configure(IApplicationBuilder app, IHostingEnvironment env)
{
var builder = new ConfigurationBuilder()
.SetBasePath(env.ContentRootPath)
.AddJsonFile("appsettings.json", optional: false, reloadOnChange: true);

builder.AddEnvironmentVariables();

if (env.IsDevelopment())
{
app.UseDeveloperExceptionPage();
}
else
{
app.UseExceptionHandler("/Home/Error");
}

app.UseStaticFiles();
app.UseCookiePolicy();

app.UseMvc(routes =>
{
routes.MapRoute(
name: "default",
template: "{controller=Home}/{action=Index}/{id?}");
});
}
Step 2: Get all the configuration settings in the form of strongly typed object:
In order to populate a strongly typed object with appsettings values, create a folder in the root web project as “Configuration”, right click on that folder, place the ApplicationSettings.cs class to hold the configuration values.
namespace AspNetCoreConfig.Web.Configuration
{
public class ApplicationSettings
{
public string ApplicationTitle { get; set; }
public string Author { get; set; }
public ContactDetails ContactDetails { get; set; }
}
public class ContactDetails
{
public string Address { get; set; }
public string Phone { get; set; }
public string Email { get; set; }
}
}
ApplicationSettings Class
NOTE: Whenever we are planning to use the ApplicationSettings class, we have to resolve the dependency for AspNetCoreConfig.Web.Configuration.
To make the instance of the ApplicationSettings class to hold the actual configuration values, we need to inject IOptions and configure the AppllicationSettings instance to hold the values from AppSettings section of appsettings.json. Modify the ConfigureServices method of the Startup class as below.

Step 3: How to use configuration in a View and Controller:
Now open the _Layout.cshtml file under Views -> Shared folder.
you need to inject IOptions<ApplicationSettings> into the view as below. Modify the _Layout.cshtml to display application title and address information in navigation and footer sections.
@using Microsoft.Extensions.Options; @using AspNetCoreConfig.Web.Configuration; @inject IOptions<ApplicationSettings> _configurationSettings; <!DOCTYPE html>
<nav class="navbar navbar-expand-sm navbar-toggleable-sm navbar-light bg-white border-bottom box-shadow mb-3"> <div class="container"> @*<a class="navbar-brand" asp-area="" asp-controller="Home" asp-action="Index">AspNetCoreConfig.Web</a>*@ <button class="navbar-toggler" type="button" data-toggle="collapse" data-target=".navbar-collapse" aria-controls="navbarSupportedContent" aria-expanded="false" aria-label="Toggle navigation"> <span class="navbar-toggler-icon"></span> </button> <a asp-area="" asp-action="Index" asp-controller="Home" class="navbar-brand"> @_configurationSettings.Value.ApplicationTitle </a> <div class="navbar-collapse collapse d-sm-inline-flex flex-sm-row-reverse"> <ul class="navbar-nav flex-grow-1"> <li class="nav-item"> <a class="nav-link text-dark" asp-area="" asp-controller="Home" asp-action="Index">Home</a> </li> <li class="nav-item"> <a class="nav-link text-dark" asp-area="" asp-controller="Home" asp-action="Privacy">Privacy</a> </li> </ul> </div> </div> </nav>
<footer class="border-top footer text-muted"> <div class="container"> © 2019 - AspNetCoreConfig.Web - <a asp-area="" asp-controller="Home" asp-action="Privacy">Privacy</a> @_configurationSettings.Value.ContactDetails.Address @_configurationSettings.Value.ContactDetails.Email </div> </footer>
To use the same values in the Controller class, add below code , open the HomeController.cs file
we have to inject IOptions<ApplicationSettings> as shown below
add using statement
using Microsoft.Extensions.Options;

 private IOptions<ApplicationSettings> _settings;
public HomeController(IOptions<ApplicationSettings> settings)
{
_settings = settings;
}
public IActionResult Index()
{
ViewBag.Title = _settings.Value.ApplicationTitle;
return View();
}
Now Run the application, you will the application title under the navigation header and footer will be displayed the address details from the configuration.

Step 4: Different Configuration files for different environments.
Create an appsettings JOSN file with the name appsettings.Production.json at the root of the project. This setting file will act as a production environment configuration.
{
"AppSettings": {
"ApplicationTitle": "Awesome Asp.Net Core App-LIVE",
"Author": "anonymous",
"ContactDetails": {
"Address": "123 State st",
"Phone": "233-345-0987",
"Email": "live@gmail.com"
}
},
"Logging": {
"LogLevel": {
"Default": "Warning"
}
},
"AllowedHosts": "*"
}
appsettings.Production.json File
Add the production appsettings file to Configuration builder as below.
var builder = new ConfigurationBuilder()
.SetBasePath(env.ContentRootPath)
.AddJsonFile("appsettings.json", optional: false, reloadOnChange: true)
.AddJsonFile($"appsettings.{env.EnvironmentName}.json", optional: false);
NOTE: make sure to add environment variables for all profiles that will be used for debugging.

Setting environment variables for an ASP.NET Core project
Run the application, You should see the title updated from the production configuration file, as shown below.

That all for now, please leave you comments and suggestion.